• Golden kitchen with Lighting

PROJECT DESCRIPTION

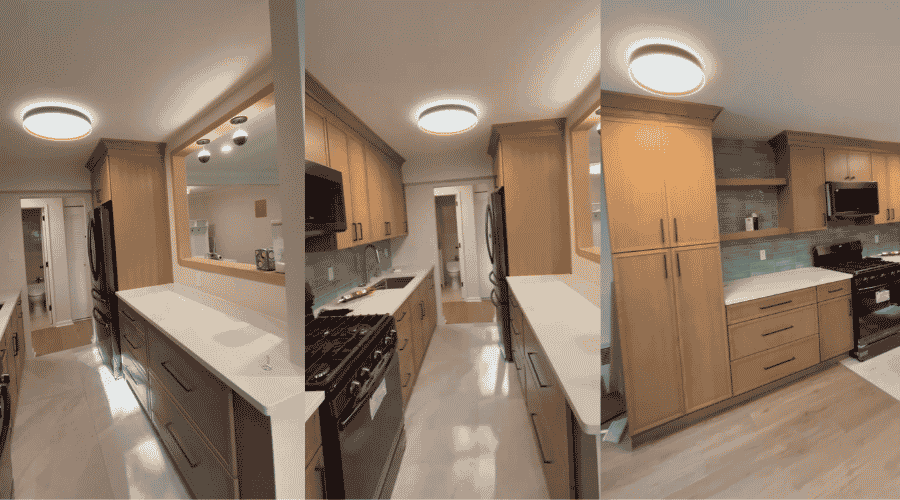
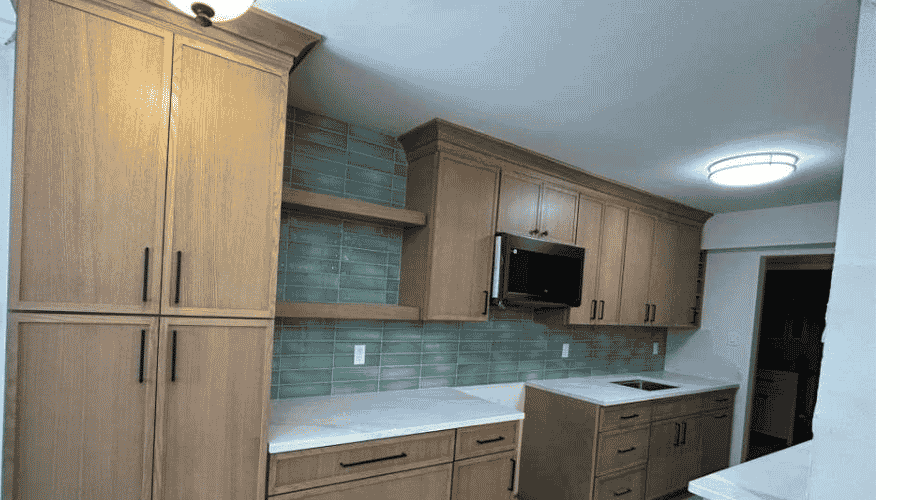
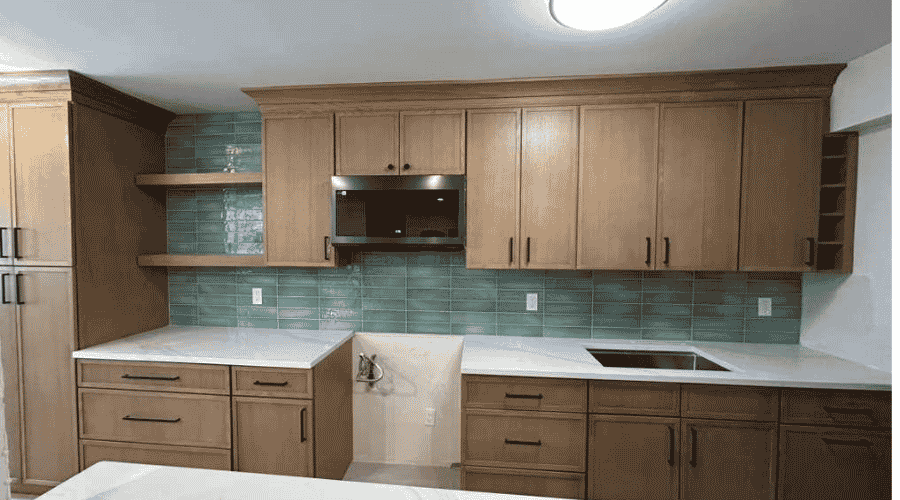
We recently tackled a kitchen update focused on making room for a larger refrigerator while giving the surrounding cabinets a fresh look. We carefully protected the floors and countertops, removed the old cabinets, widened the fridge opening, and added finished side panels and a top cabinet for a built-in feel.

Along the way, we installed new modern wall cabinets and replaced all the old base cabinet doors and drawer fronts with new ones, including hardware. The result was a more open, functional, and updated kitchen—without a full gut renovation.

  • DATE: April 15, 2026
  • Client: Ash*** **esh
  • Address :  Long Island, NY
  • Architect: Noah Sukhoo
  • Builder: Great Ark Construction
  • Budget: $17,500

Contract Details

Mobilization, Protection & Site Preparation

  • Protect floors, countertops, and surrounding finishes: Before any work begins, all exposed surfaces in and around the work zone are covered with heavy-duty canvas drop cloths, ram board, or adhesive plastic film. Countertops receive padded covers to prevent scratches and dents, while nearby finished walls and trim are masked off to safeguard against dust and accidental impacts.

  • Install dust barriers as needed: Zippered plastic sheeting is erected at doorways and along hallways leading to the kitchen. For larger projects, a full containment system with negative air pressure may be used to prevent construction dust from migrating to living spaces. All HVAC vents in the work area are sealed temporarily.

  • Maintain daily job site cleanup: At the end of each workday, all debris is swept and bagged, tools are stored safely, and surfaces are wiped down. A designated debris staging area is kept organized, and a final walkthrough ensures no nails, screws, or trip hazards remain before the team departs.

bgcta

Demolition & Removal

  • Remove existing cabinets surrounding refrigerator area: All face frames, shelves, and fasteners are carefully detached to avoid damaging adjacent cabinetry or the refrigerator itself. If cabinets are salvageable for donation or reuse, they are removed intact using pry bars and oscillating tools with precision.

  • Remove designated wall cabinets: Screws, cleats, and mounting brackets are located and removed. Cabinets are lowered one at a time with a helper or lift system to prevent wall damage. Any electrical or plumbing passing through the cabinets is identified and capped or rerouted as necessary.

  • Dispose of all debris: All demolished materials — including wood, laminate, MDF, fasteners, and hardware — are loaded into heavy-duty contractor bags or a debris dumpster. The job site is kept clear of clutter, and responsible disposal methods (recycling where possible) are followed per local regulations.

Refrigerator Opening Modification

  • Enlarge and adjust opening for larger refrigerator: Using a reciprocating saw or circular saw, the existing rough opening is expanded laterally and/or vertically to match the new refrigerator’s specifications. Care is taken to avoid cutting electrical wires or plumbing lines. A laser level ensures the new opening is plumb and square.

  • Modify framing for proper fit and ventilation: Additional studs or blocking are installed to reinforce the enlarged opening. If the refrigerator requires rear or side ventilation, the framing is notched or spaced accordingly. Shims are added to level the floor within the opening, and any protruding drywall or old adhesive is scraped smooth.

  • Install finished side panels and top cabinet/panel: Matching plywood or custom laminate panels are cut to size and attached to the refrigerator enclosure sides to create a built-in look. Above the refrigerator, either a shallow top cabinet or a decorative panel is installed flush with the adjacent upper cabinets. All edges are trimmed and caulked for a seamless finish.

kitchenlight

Base Cabinet Door Replacement & Finishing

  • Remove existing base cabinet doors and drawer fronts: Each door is unscrewed from its hinge plate, and drawer fronts are detached from the drawer boxes. Hinges and slides are either removed for replacement or saved if being reused. All old hardware is bagged and labeled for disposal or client retention.

  • Supply and install new cabinet doors/drawer fronts: New doors and drawer fronts (in the same modern style as the wall cabinets) are unpacked and matched to their respective openings. Hinges are pre-installed on the doors, and drawer fronts are aligned and screwed onto the existing drawer boxes using a jig for consistent overlay.

  • Install hardware (handles/pulls): Using a drilling template, precise holes are marked and drilled into each door and drawer front. Handles or pulls are then attached with machine screws from the back. Soft-close mechanisms are adjusted if integrated into the hinges or slides.

  • Adjust hinges and perform final detailing: Each door is adjusted for six degrees of freedom — up/down, left/right, in/out, and tilt — using a hex wrench on European-style hinges. Drawer fronts are tweaked for even gaps. All surfaces are cleaned of pencil marks and dust, hinges are lubricated lightly if needed, and a final operation test ensures smooth, silent closure.